If you need to install or reinstall Windows 10, you can use the tools on this page to create your own installation media using either a USB flash drive or a DVD.
Before you begin
Make sure you have:
An internet connection (internet service provider fees may apply).
Sufficient data storage available on a computer, USB or external drive for the download.
A blank USB or DVD (and DVD burner) with at least 4 GB of space if you want to create media. We recommend using a blank USB or blank DVD, because any content on it will be deleted.
If you will be installing the operating system for the first time, you will need your Windows product key (xxxxx-xxxxx-xxxxx-xxxxx-xxxxx). For more information about product keys and when they are required, visit the FAQ page.
The work will take about 1-3 hours depends on
how competent and how brave you are.
First of all, I just
want to say that most of the instructions below were not written by me. Most of
the pictures were not taken by me. The credits belong to the original writer.
SUBJECT
Doors Will Not Unlock Using the Key Fob or
Central Locking Button
MODEL
E90, E91 (3 Series) produced up to 11/2008
SITUATION
One or more of the doors may not unlock when
using the remote key outside the vehicle, or the central locking button inside
the car. It is still possible, however, to unlock the door by using the key in
the driver's door lock cylinder or by pulling the door handle on the inside of
the car.
Typically fault codes A6D4 and A6D5 are
stored in the Junction Box Electronics (JBBF).
CAUSE
This is due to a blown fuse in the JBBF
caused by either:
An excessive amperage draw by one of the door
lock actuators, which is commonly attributed to silicone contamination; or
An intermittent, but acceptable, amperage
spike slightly above 15A, due to normal variation in the locking system.
CORRECTION
Replace the fuses 56 and 57 with one of a
different rating-20A.
NOTE: Never spray any silicone products into
the latch, as this will lead to premature failure.
PROCEDURE
Inspect fuse 57 (up to 9/07 production) or 73
(from 9/07 production) in the JBE.
Replace the blown 15A fuse with a 20A fuse.
Perform a function test by activating the
door locks 10 times in succession via the central locking switch.
NOTE: The thermal protection will be
activated after about 15 successive activations and does not indicate any
damage to the system.
Carefully observe the operation of each lock
actuator while it is being cycled. Lock actuators with some degree of damage
will exhibit noticeable symptoms of this, such as slow operation, abnormal
noises, etc.
If either one of the front door lock
actuators is determined to be the source of the blown fuse, both front door
latches (which contain the lock actuators) should be replaced per Repair
Instruction REP 51 21 090. For this replacement, the door latch kit, which
contains both the left and right side latches, must be used.
If either one of the rear door lock actuators
is determined to be the source of the blown fuse, only that single faulty latch
should be replaced per Repair Instruction REP 51 22 090.
If one of the front lock actuators and one of
the rear lock actuators appears to be faulty, both front latches and the single
faulty rear latch should be replaced per Repair Instruction REP 51 21 090 and
REP 51 22 090.
If no faulty lock actuators can be
identified, wait 2 minutes and then repeat step 4.
NOTE: If any door latches are to be replaced,
the attached procedure should be utilized in conjunction with the REP noted
above. This attachment will reduce the amount of time necessary to perform the
replacement.
After the second functional test, if no
faulty lock actuators can be identified, none of the latches should be
replaced.
PARTS INFORMATION
51 21 7 263 086
Door latch kit (contains both left and right
latches)
51 22 7 060 295
Door latch – left rear
51 22 7 060 296
Door latch – right rear
61 13 6 942 071
20 Amp mini fuse
The tools used are pictured below.
·The window was brought down so that about
4-5" OPEN
·Disconnect the battery
·The "wood" trim
was removed using the plastic trim tools starting toward the inside
(right-hand-side of the photo).Pull the trim from the side closest to the
hinge since the other side (the side closest to the door lock) is a hook.
·The three Torx-20 screws were removed from the
panel. These will fall out once you unscrew them all the way, don't worry if
they don't, they'll fall out once you remove the panel.
·To remove the door panel I
started toward the top inside corner near the window speaker (right-hand-side
of the photo), again using the plastic trim tools. I worked clockwise until all
that remained was removing the panel from the upper clips. The fasteners hold
up well as I removed the panel a number of times. Once the panel was removed
over the unlocking button, the wires were unplugged, and the Bowden cable was
unhooked (see photos).The tape in the picture of the black interior
is where the hooks are. Make note of where each cable goes. There are five
cables: speaker, mirror, and window control, flood light (bottom of door) and
door handle hook.
·The unlocking button rod
was pulled straight out of the actuator.
·The power cable to the
windows has press-point and rotating lever to get it unhooked from the panel
(see photo).
·The vapor barrier was
completely removed. It goes back on nicely.Use a sharp blade to help you cute the sticky
butyl tape. You don't want it all bunched up and messy when you put it back
together.
·No special tool was used to
unhook the window glass from the window regulator. I just used the plastic trim
tools behind the glass to pry the clip out enough to pull the glass up. See the
photo with the circular hole in the glass to see what you're dealing with.This is the tricky part. There are two hooks that you'll need to unclip. If
you find that you don't have enough space for your hands to go in and out to
unclip the window just reconnect the battery and power window cable and play
with it to move the window to a comfortable position. TAPE the window glass to
the top of the door so once you unclip it, it won't fall down and shatter the
glass, I doubt this will happen but better to be safe. I have small hands and
after 30 minutes, I was able to unclip both holes. This is the WORSE part out
of this entire DIY. If you have big hands you're pretty much screwed. To get a
good idea of where the hook is, look down into the hole of the glass, you’ll
want to take your right hand position it behind the glass, grab the plastic
clip and pull outwards and using your left hand, pull/push the glass upwards to
unclip.
·Once the glass was out, I
removed the two 10 mm nuts holding the outside window regulator guide to clear
some space.You can't really remove the window regulator,
just remove the two nuts and gently stuff it down and to the left out of the
way. The tension cables will still be intact so it's kind of tricky to move it
around, but as long as it's down as far as possible you'll have enough space.
·The door lock was removed
by removing the small circular cover on the side of the door and removing the 4
mm Allen bolt. As far as I can tell, you must remove this first or the actuator
will not come out. This is referring to
the keyhole piece. The Allen bolt should come out all the way, be careful it
doesn't drop inside the door panel.
·With the door lock out you
can reach up from the inside of the door and unclip the wires from the
actuator. There are two: one is on the bottom; the other is on the side. The
wires are tied to plastic plugs that are pressed into supporting holes on the
actuator. You can see these a bit in one of the photos showing the exterior
door handle cable.
·To unhook the exterior door
handle cable from the actuator reach from the inside of the door and grab the
white plastic end and pull it out of its slot in the actuator. The second point
of attachment should come off the actuator lever at the same time (see photo of
cable end). Be sure to get both of slotted attachment points back on properly
on the new actuator and confirm that the exterior handle works before closing
things up.Aside from the exterior door handle cable,
there was another plastic clip that was attached to my actuator with no purpose
other than to route a cord out of the way of the window I suppose. These was
hard to remove, you just have to yank and twist it out.
·I then removed the actuator
by removing the three Torx-30 screws. For comparison I've
shown the old (left) and new (right) actuators from several angles. Also shown
is the actuator and door lock, showing the point at which the door lock enters
the actuator. Once you take the
defective actuator out, you'll be confident enough to remember the steps to put
everything back together. Just to make sure, I checked that the actuator was
fixed before I placed the door panel and vapour barrier back on.
SI B51 19 07 Body Equipment September 2009 Technical Service
This Service Information bulletin supersedes SI B51 19 07 dated September 2009.
designates changes to this revision
SUBJECT Doors Will Not Unlock Using the Key Fob or Central Locking Button
MODEL E90, E91 (3 Series) produced up to 11/2008
SITUATION One or more of the doors may not unlock when using the remote key outside the vehicle, or the central locking button inside the car. It is still possible, however, to unlock the door by using the key in the driver's door lock cylinder or by pulling the door handle on the inside of the car.
Typically fault codes A6D4 and A6D5 are stored in the Junction Box Electronics (JBBF).
CAUSE This is due to a blown fuse in the JBBF caused by either:
An excessive amperage draw by one of the door lock actuators, which is commonly attributed to silicone contamination; or
An intermittent, but acceptable, amperage spike slightly above 15A, due to normal variation in the locking system.
CORRECTION Replace the fuse with one of a different rating.
Replace the necessary actuator as well, but only if it is drawing excessive amperage.
NOTE: Never spray any silicone products into the latch, as this will lead to premature failure.
Inspect fuse 57 (up to 9/07 production) or 73 (from 9/07 production) in the JBE.
Replace the blown 15A fuse with a 20A fuse.
Perform a function test by activating the door locks 10 times in succession via the central locking switch.
NOTE: The thermal protection will be activated after about 15 successive activations and does not indicate any damage to the system.
Carefully observe the operation of each lock actuator while it is being cycled. Lock actuators with some degree of damage will exhibit noticeable symptoms of this, such as slow operation, abnormal noises, etc.
If either one of the front door lock actuators is determined to be the source of the blown fuse, both front door latches (which contain the lock actuators) should be replaced per Repair Instruction REP 51 21 090. For this replacement, the door latch kit, which contains both the left and right side latches, must be used.
If either one of the rear door lock actuators is determined to be the source of the blown fuse, only that single faulty latch should be replaced per Repair Instruction REP 51 22 090.
If one of the front lock actuators and one of the rear lock actuators appears to be faulty, both front latches and the single faulty rear latch should be replaced per Repair Instruction REP 51 21 090 and REP 51 22 090.
If no faulty lock actuators can be identified, wait 2 minutes and then repeat step 4.
NOTE: If any door latches are to be replaced, the attached procedure should be utilized in conjunction with the REP noted above. This attachment will reduce the amount of time necessary to perform the replacement.
After the second functional test, if no faulty lock actuators can be identified, none of the latches should be replaced.
PARTS INFORMATION Part Number Description Quantity
51 21 7 263 086 Door latch kit (contains both left and right latches) As required
51 22 7 060 295 Door latch – left rear As required
51 22 7 060 296 Door latch – right rear As required
61 13 6 942 071 20 Amp mini fuse 1
WARRANTY INFORMATION Covered under the terms of the BMW New Vehicle Limited Warranty or the Certified Pre-Owned Program for the second cause listed above.
NOTE: If both front door latches are being replaced, the door latch kit noted above must be used as opposed to ordering both left and right latches separately. Failure to use and claim this part kit will result in a delayed or denied claim.
By default the in Outlook 2013, the Outlook Weather Bar will display temperatures in Fahrenheit, if you want to change the settings to show the temperature in Celsius follow these simple instructions.
Open Outlook 2013, and click the File tab, and Options.
When the Options dialogue box opens, select Calendar from the left hand menu, and scroll to the bottom of the options page.
Change the radio button from Fahrenheit to Celsius, and click OK.
Outlook 2013 introduced a new in-line compose method for email replies and forwarded messages, designed to make it easier for you to quickly write & send an email. However, the Outlook 2013 in-line method may prove to be a frustration source, especially if you are used to browse other emails while you are composing a reply. This short tutorial explains how to configure Outlook 2013 to always pop out a new email window, when you reply or forward it.
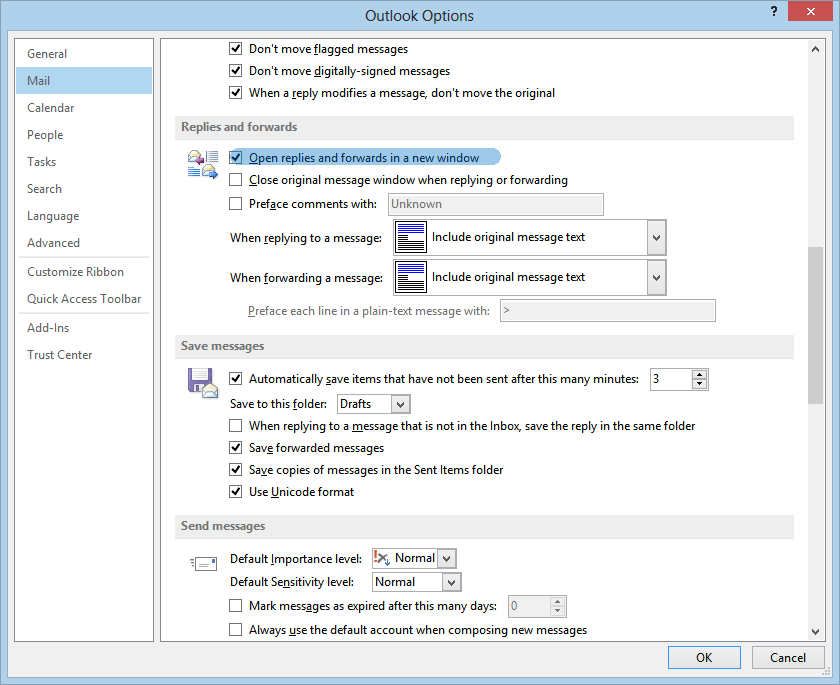
To make Outlook 2013 always pop-out an email window when you reply or forward, all you have to do is to go to your Outlook File menu -> Options -> on the Mail tab, scroll down and locate the Replies and forwards section. On this section, enable the option “open replies and forwards in a new window“:
If you later want to return to the in-line message compose method, simply follow the same steps and un-mark the option to always pop out a new window when you reply or forward emails.
If you need to install or reinstall Windows 8.1, you can use the tool on this page to create your own installation media using either a USB flash drive or a DVD.
Before you begin, here are some things you'll need:
PC with a reliable Internet connection. The download is about 4 GB and the time it takes to download will vary based on your PC, your connection speed and other factors.
USB flash drive. Use a USB flash drive with at least 4 GB of space. We recommend using a drive with nothing on it because any content will be deleted.
-or-
DVD. This requires a DVD burner on or connected to the PC you're using to create the media, and a DVD player on the PC where you want to install Windows 8.1. Use a DVD with at least 4 GB of space. We recommend using a blank DVD because any content on it will be deleted.
Here are some things to check on the PC on which you want to install Windows 8.1:
64-bit or 32-bit processor (CPU). You'll need to download either the 64-bit or 32-bit version of Windows 8.1 which is appropriate for your CPU. To check this on your current PC, go to PC info in PC settings or System in Control Panel and look for System type.
System requirements. See the system requirements before installing Windows 8.1. We also recommend that you visit your PC manufacturer's website for info about updated drivers and hardware compatibility.
Language in Windows. You'll need to choose the same language when you install Windows 8.1. To see what language you're currently using, go to Time and language in PC settings or Region in Control Panel.
Edition of Windows. You should also choose the same edition of Windows. This might be Windows 8.1 or Windows 8.1 Pro. To check what edition you're currently running, go to PC info in PC settings or System in Control Panel and look forWindows edition.
When you're ready, connect your USB flash drive or insert the DVD, tap or click Create media, then follow the instructions.
* Your use of the Windows media creation tool is governed by the Microsoft Terms of Use for this website.
After you've created the installation media, do one of the following to install Windows 8.1:
Connect the USB flash drive to the PC where you want to install Windows 8.1, browse to it in File Explorer, then open the setup.exe file. Follow the instructions in set-up.
If your PC is set up to boot from a USB drive, connect the USB flash drive to the PC where you want to install Windows 8.1, restart (reboot) it, then follow the instructions in set-up.
If your PC is set up to boot from the DVD drive, insert the DVD into your PC, restart (reboot) it, then follow the instructions in set-up.
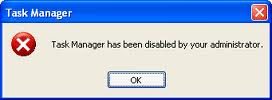
Windows Task Manager is used to view details about processes running on your computer. Since it can be used to terminate programs that are misbehaving or are viruses disguised in the form of harmless programs, most spyware and viruses disable it to prevent themselves from being closed through it. Some administrators also disable Task Manager to prevent users from closing important security programs like antiviruses and anti-malwares. In such situations, running the Task Manager will give the "Task Manager has been disabled by Administrator" error. However, there are some techniques you can use to re-enable task manager and close those harmful programs manually. This article contains few such simple techniques you can use to regain access to Task Managing privileges.
Enable Task Manager from Registry in Windows 8, 7, XP or Vista
Registry Editor is an inbuilt Windows tool that is used to modify registry keys which tell Windows how it should work. A simple registry modification can be used to bypass the Task Manager block. To do so, just follow the steps:-
Click on Start. Go to Run. If you use Windows 8, Windows 7 or Windows Vista, go to Search.
Type regedit and press Enter. Registry Editor will start.
Through the left hand navigation pane, navigate to HKEY_CURRENT_USER\Software\Microsoft\ Windows\ Current Version\Policies\System. If the System key is not there, you will need to create it.
In the work area, locate "DisableTaskMgr". If this value is not there, you will need to create a new DWORD value called DisableTaskMgr. Double click on it. A window will pop up.
Enter its value data as 0 and press OK.
Close Registry Editor. If Task Manager is still disabled, restart your computer.
Google has updated chrome with a new "new tab" page that shows all your most visited pages every time you open a new tab, and needless to say not everyone's excited to see their most viewed sites every time they open a tab. Here is how to disable it.
It's not just the obnoxious most visited pages tab that's annoying in the new "new tab" page. It's also a redundant search bar and the fact "recent tabs" are hidden away. You can switch back to the old view easily though:
Type chrome://flags into the address bar.
Search for the option labeled "Enable Instant Extended API."
Change it from "Default" to "Disabled."
Restart Chrome.
That should fix the problem and get you back to the old Chrome "new tab" page.